How to use two different fonts in one Squarespace heading
Have you seen a website heading that uses two different font styles in one heading and wondered how it's done?
When setting up your website styles, Squarespace allows you to select a different font for headings and one for paragraphs.
But what if you want use two different font styles within one heading?
Here’s a quick tutorial to mix things up a little and create a unique design style. It requires a bit of CSS but the results are so fun.
How to apply simple CSS code to create two font styles in one heading
Here’s a sample from my demo website of using two different font styles within one heading. It’s a great way to create visual interest and make an ordinary headline really stand out.

Ready to learn?
You’ll want to first determine which fonts you want to work with. In the above example, I’m using a default Squarespace font called Agenda for my H1 (heading 1).
For the secondary script font, I’m using a purchased font called Unforgiven (you can use any font that you own or have rights to use). So let’s take a look at how to get this correctly set up.
NOTE: In this example we’ll use the h1 tag, but this process can also be applied to the h2, h3, h4, and paragraph tags in Squarespace.
1) Create the heading
Create a new text block on your page and type out your heading, and assign it the h1 tag or heading 1. So you should see the font you selected for your headings when you set that up in the Squarespace fonts panel.

Step 2 | Upload your custom font to Squarespace
From your Squarespace website dashboard, navigate to Website -> Utilities -> Website Tools -> Custom CSS*.
*FYI, the Custom CSS panel has recently moved, and you’ll need to scroll to the very bottom of your website pages until you find the sub-title Utilities (as seen below).
Within the Custom CSS panel, click on Custom Files. Upload the font file from your computer, and it’s now saved in your Custom Files.


3) Copy and paste the custom CSS
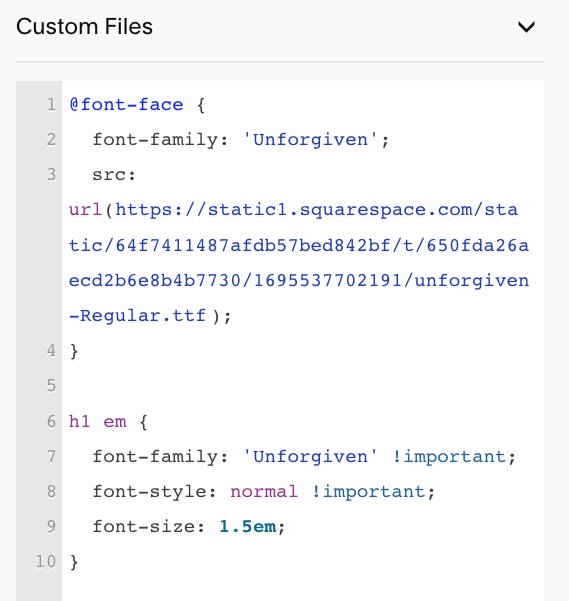
Click inside the Custom CSS panel window and add the following custom code:
@font-face {
font-family: 'FontTitle';
src: url(FontURL);
}
h1 em {
font-family: 'FontTitle' !important;
font-style: normal !important;
font-size: 1.5em;
}
4) Modify the custom CSS
Replace the bolded items from the above CSS code with your own content.
Change FontTitle to the name of your custom font, while maintaining the apostrophe on either side.
Then use your cursor to highlight FontURL and hit delete on your keyboard. Your cursor should still be sitting in the middle of the two parenthesis.
Click on the Custom Files dropdown, and click once on the font file you just uploaded. The URL of the custom font should automatically populate between the two apostrophes of your CSS code.
The font-size can be adjusted to your liking after you’ve had a chance to see the results.
In the code above I’ve highlighted the h1 em because I want to point out that we’re actually going to apply your custom font ONLY to the italics version of your h1 heading. More on that below :-) But the additional code line of font-style: normal!important is added so that we declare it NOT to display an italicized version of the custom font.
Click SAVE.

5) Apply the style to your heading text
Go back to the text block with your heading and highlight the word(s) you’d like to see in your chosen secondary font style.
Click the I for Italic in the toolbar, and watch the magic happen! Your italicized text should transform into the custom secondary font you uploaded.
If you need to adjust the font size of the secondary font, simply go back to your CSS and adjust the font-size value.
This process can also be applied to any heading or paragraph style, so play around with different options.
To remove the style, simply do the reverse. Highlight your text and click the “I” for italics to revert back to your regular h1 style.

Happy designing and let me know how this tutorial worked out for you.
Enjoy this post? You may also want to check out these!
⚡️ Change a section banner image for mobile view in Squarespace 7.1
⚡️ How to swap out the header logo on a single page in Squarespace
⚡️ How to remove the header and footer on a single Squarespace page