Working with page sections in Squarespace Fluid Engine

You’ve probably noticed, especially over the last year or so, some major improvements to working with page sections within your website. With these updates, Squarespace has made creating a website even more efficient, allowing for more time to be creative and productive.
Think of your page sections as handy building blocks. You can create and customize them, duplicate them, rearrange them, or put them in a safe place to use again elsewhere. If you haven’t yet had a chance to fully explore some of the great ways to use page sections, here are a few tips to get you started.
4 Efficient ways to use page sections on your Squarespace website
Duplicate a page section
Duplicating a page section is a quick way to maintain some design elements and content that you’re working with, while creating a new section with similar features. Use the original page section as a starting point, and then duplicate it to play around with different backgrounds, colors, images, or text.
I tend to duplicate a section a couple of times, and create slightly different versions of the same content to see which one may be a better fit for the overall page layout. That way I can make some styling or content changes on one of the sections before fully committing to it.

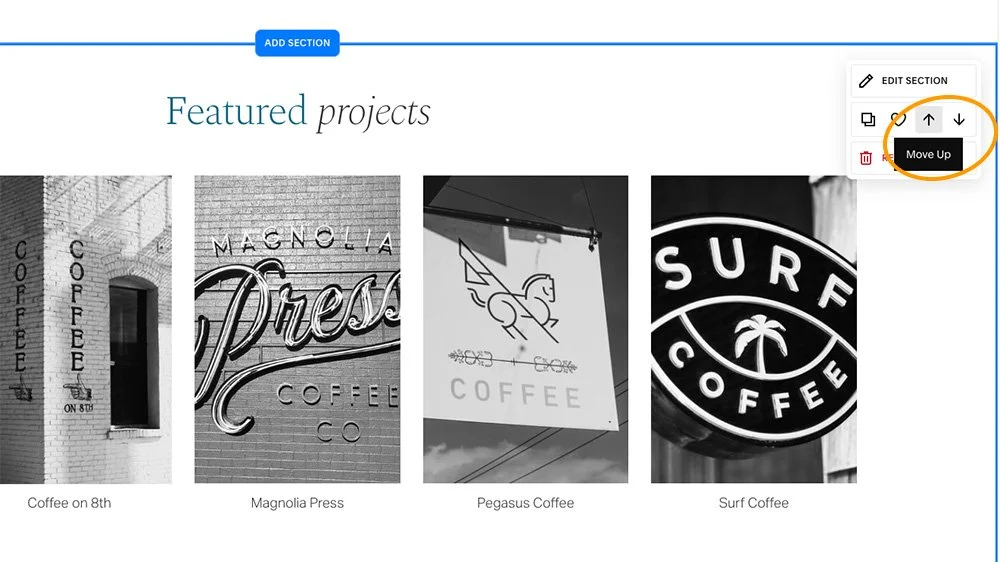
2. Reorder page sections
Being able to reorder page sections in Squarespace 7.1 is a big benefit, making it easy to rearrange content and organize important sections as needed. You can move page sections up or down by simply clicking on the up/down arrows located within the Edit Section menu. Play around with where the section fits best within the website page. Think about how a visitor to your website will digest the content, and which order makes the most sense.
3. Save a page section
A relatively new (and much appreciated!) feature that Squarespace has added is the ability to save a page section. Click on the heart icon within the Edit Section menu. The section will be saved into the Saved Sections area of your website. Think of this as a way to create a back-up of your custom designed sections and a way in which you can use them again on different pages.
Designer Tip: Check the page design/alignment in mobile view and make any adjustments first before saving the section. That will save you time from having to adjust the mobile view if you re-use that section on another page.

4. Reuse a saved page section
This is another brilliant update from Squarespace and a massive time saver. From any page of your website, click on Add Section. A menu will pop open which now includes a Saved Sections area of all the sections you’ve saved thus far (here you can also delete sections you no longer need). Click on the section you want to insert, and it will automatically populate on your page. So handy!
I’ve been providing clients with all of their website sections already pre-saved. During the website handoff, we walk through the basics of content editing, including taking a look at the Saved Sections area. Knowing that they have these sections to refer back to (should they make a mistake) and the ability to create new pages on their own using the pre-built saved sections will give them a lot of confidence when editing their own website in the future ;-)

I hope you’ve found this post helpful and informative. Most importantly - have FUN designing your Squarespace website!