How to organize your images in Squarespace
When you’re working on a website, it’s easy to get lost in all the images and design elements you’re using to build the web pages.
Luckily, Squarespace has made organizing your images and graphics easy within the Asset Library.
If you’re not familiar with using the Asset Library yet, here is a tutorial with some simple tips to get started.
You’ll be able to quickly manage all your assets and organize them in a way that makes sense for you and your website - and your brain will thank you for it!
Where is the Squarespace Asset Library located?
The Asset Library is located within the main Squarespace website panel under “Website”. Once you click the link you’ll be to see and access all the images and videos uploaded to your website.
You’ll notice that there are two ways to view your files: in a grid format or a list format. In both cases, you can view the file type, dimensions, size, and upload date by clicking on the three little dots next to the file.

How to add files to the Asset Library in Squarespace
1. Add files with content blocks
When you add a new image to your web page with the image block - either by uploading it or selecting a stock image - the file is then automatically stored in your Asset Library.
This is a great feature since you may need to use that same image again elsewhere. You won’t need to upload it again or go hunting for it in your computer files. It will already be saved in your Asset Library for quick access.
The same goes for galleries, background images, and video files. Although video storage is limited, it’s still a big plus to be able to store videos for your Squarespace site in this way.
💡 PRO TIP: Your images should be below 500KB in order to maintain best-practice SEO.

2. Manually upload files to the Asset Library
If you’re working within a website that has a lot of images or design assets (I’m talking to you Photographers!), you can now manually upload files directly from your computer to the Asset Library in bulk.
This is a HUGE time-saver. Simply click on + ADD NEW in the upper right corner of your screen, and select UPLOAD FILES. You can select more than one file at a time.
💡 PRO TIP: You can now also drag and drop images from your computer directly into the Asset Library.
How to organize images with folders in the Asset Library in Squarespace
Within the Asset Library you can create folders to help organize and manage your images and video files.
You can organize your folders by web page, by client, by event, etc. This will save you loads of time when building out the website or when revisiting the site for updates.
1. Create a folder in the Asset Library
Click on + ADD NEW in the upper right corner of the screen, and select FOLDER. Folders will appear at the top of your Asset Library.
You can also use this same step to create a folder inside a folder.
So if you’re a photographer (for example) this is the perfect way to organize all your photos and find them quickly when creating your portfolio pages.

2. Add existing images to a folder in the Asset Library
If you’ve already accumulated a lot of images in your Asset Library and now want to organize them into folders, there’s a quick trick to do that.
First, create and name the folder you want to put them in, if it doesn’t already exist.
Next, put a check mark on the photo(s) that you wand to move into that folder.
Then, click on the folder icon that appears under “MOVE TO”, and a menu will pop up where you can select your folder.
That’s it! Your image(s) will be moved into that selected folder. Images can always be moved into (or out of) a different folder.

How to delete files from the Asset Library in Squarespace
Similar to the process mentioned above, to delete a file(s) from anywhere in the Asset Library, put a check mark on the image(s) you want to remove. Then click on the red TRASH icon to delete the file(s).

How to access the Asset Library when designing a web page in Squarespace
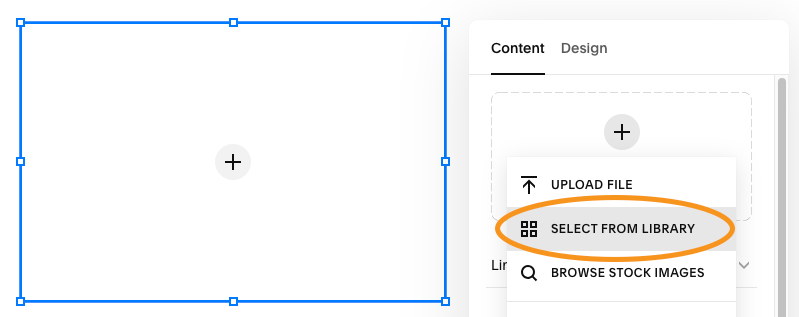
Now that you’ve got your images in your Asset Library nice and organized, you can access them anytime. When adding an image, a thumbnail, a section background, or a gallery for example, simply click on the option to SELECT FROM LIBRARY. This will open up the Asset Library and you can quickly find and select the image you’re looking for.
I hope you’ve enjoyed this short tutorial about using the Asset Library in Squarespace. As always, reach out with questions… and happy designing!

Haven’t selected your website hosting plan yet? No problem!
Get 20% OFF your first year of Squarespace here.*
*This is an affiliate link. Full disclaimer.
If you enjoyed this post, you’ll also like:
⚡️ Fluid Engine - An overview of Squarespace’s new 2022 page editor
⚡️ 7 Useful Squarespace website plugins to check out
⚡️ How to remove the header and footer on a single Squarespace page