How to use custom fonts on your Squarespace website

Squarespace has a long list of great fonts and font pairings to use within your website that are built into the platform.
From serif to sans-serif, Squarespace has made it very easy to select fonts and modify them as needed by navigating to your website’s Site Styles (click on the paintbrush icon in the upper right corner of your website).
But what if your brand’s fonts aren’t included in the list of website fonts that Squarespace provides in the site styles panel?
There are different scenarios in which you may want to use custom fonts on your Squarespace website.
This simple tutorial walks through the steps of uploading and using custom fonts within your Squarespace 7.1 website.
Reasons why you’d want to upload custom fonts to your Squarespace website:
Your brand has a unique font(s) that helps define its brand style, and it’s not included in Squarespace’s default fonts list.
You’ve worked hard to build your brand style and aesthetic, including the use of your brand’s typography. Although you don’t find your brand fonts within the default Squarespace list, you can still use your own custom fonts, and you’ll be able to maintain brand consistency throughout your website.
You want to create a specific effect with a font style that isn’t included in the site styles font list.
You may want to use a good decorative or display font to create design elements within your website. Or maybe a handwritten or script font style that you’ll be using sparingly throughout your website is something you’re interested in trying.
You’re just not crazy about the fonts that Squarespace has included and you’d like to use something different.
You’re not interested in the built-in fonts that Squarespace provides, so you’ve purchased a new font from an outside resource and want to use it within your website.
Add custom fonts to your Squarespace website by following these steps below:
Step 1 | Select your custom font
Because you’re going to be using custom fonts, it’s very important that you have full rights or have purchased the rights to use the fonts. If you already own your brand fonts, you likely have them accessible on your computer.
If you’re searching for fonts, there are plenty of resources for free and paid fonts including Google Fonts, Font Squirrel, MyFonts, and Creative Market, so take the time to browse and find what you need. Make your purchase and download the new fonts to your computer.
The font files should be in .ttf, .otf, or .woff format.
NOTE: In the following steps, we’re going to use an h1 or heading 1 as an example, which would be the main heading of your website page.

Step 2 | Upload your custom font to Squarespace
From your Squarespace website dashboard, navigate to Website -> Website Tools -> Custom CSS.
Within the Custom CSS panel, click on Custom Files. Upload the font file from your computer, and it’s now saved in your Custom Files.


Step 3 | Add the custom CSS code in Squarespace
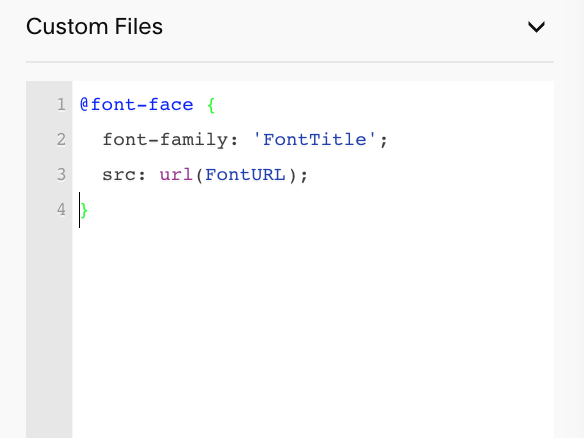
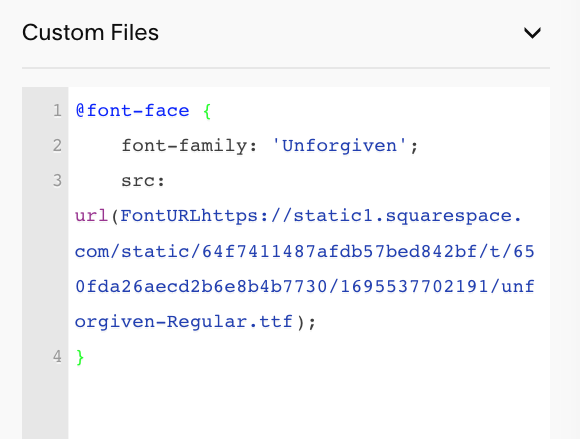
With your custom font now uploaded, we’ll need to add some CSS code. This code will help assign your new font to a specific heading. Add this code to your CSS panel:
@font-face {
font-family: 'FontTitle';
src: url(FontURL);
}
Change FontTitle to the name of your custom font, while maintaining the apostrophe on either side.
Then use your cursor to highlight FontURL and hit delete on your keyboard. Your cursor should still be sitting in the middle of the two parenthesis.
Click on the Custom Files dropdown, and click once on the font file you just uploaded. The URL of the custom font should automatically populate between the two apostrophes of your CSS code.
Step 4 | Add custom CSS for the heading
Now let’s modify the heading tag by adding this CSS code below.
NOTE: In this example we’ll use the h1 tag, but this process can also be applied to the h2, h3, h4, and paragraph tags in Squarespace.
h1 {
font-family: 'FontTitle';
}
Replace FontTitle with the name of your custom font, while maintaining the apostrophe on either side.
At this point, you should see the font of your h1 heading change in real time.


Step 5 | Stylize your font
Now that you’ve successfully assigned your custom font to your h1 tag, you can add some customization specific to that particular heading by including some basic CSS such as:
h1 {
font-family: 'FontTitle';
letter-spacing: 0.1em;
line-height: 1.5em;
}
Play around with the settings and choose what works best for your brand’s unique style.
Most importantly… have fun adding custom fonts to your Squarespace website!
If you enjoyed this post, you’ll also like:
⚡️ 10 Important questions to ask when hiring a website designer
⚡️ Change a banner image for mobile view in Squarespace 7.1
⚡️ How to swap out the header logo on one page in Squarespace